> For the complete documentation index, see [llms.txt](https://docs.saros.xyz/llms.txt). Markdown versions of documentation pages are available by appending `.md` to page URLs; this page is available as [Markdown](https://docs.saros.xyz/saros-mobile-app/mobile-app/migrate-ramper-v2-on-super-app.md).

# Migrate Ramper V2 on Super App

To enhance performance and improve user experience, we have launched the latest version for social login.

* Please update to the latest version and log in using it.
* We will discontinue support for the old version on December 31, 2024.

### **HOW TO ADD NEW VERSION WALLET** <a href="#how-to-add-new-version-wallet" id="how-to-add-new-version-wallet"></a>

#### 1. AppleID / Facebook <a href="#id-1.-appleid-facebook" id="id-1.-appleid-facebook"></a>

**Step 1:** Access the Saros Super App.

* For existing users, proceed to Step 2
* For new users, proceed to Step 3.

**Step 2:** Click on Wallet section in the top left corner, then **click** ![:heavy\_plus\_sign:](https://pf-emoji-service--cdn.us-east-1.prod.public.atl-paas.net/standard/caa27a19-fc09-4452-b2b4-a301552fd69c/32x32/2795.png) **Icon** on the top right corner

<figure><img src="https://904341613-files.gitbook.io/~/files/v0/b/gitbook-x-prod.appspot.com/o/spaces%2F-MH4bZ3PuLVs6zPxsi0v%2Fuploads%2FhxFr0L48nzIVqe1utoma%2Fimage-20240528-122356.png?alt=media&amp;token=dbbdef9f-8c6e-44ec-8b40-3a3dd3ba9dc5" alt="" width="563"><figcaption></figcaption></figure>

<figure><img src="https://904341613-files.gitbook.io/~/files/v0/b/gitbook-x-prod.appspot.com/o/spaces%2F-MH4bZ3PuLVs6zPxsi0v%2Fuploads%2FXazfVL95tEUOPDtQkiol%2Fimage-20240528-122426%20(1).png?alt=media&amp;token=fea23e3e-6bf4-4e19-a1cd-a3f88c63d727" alt="" width="375"><figcaption></figcaption></figure>

**Step 3:**

* Select “Social Wallet” → it will navigate to the web view.
* Choose social wallet method “Apple ID” or “Facebook“

<figure><img src="https://904341613-files.gitbook.io/~/files/v0/b/gitbook-x-prod.appspot.com/o/spaces%2F-MH4bZ3PuLVs6zPxsi0v%2Fuploads%2FfZ4UleO7H8M3mjSoBuji%2Fimage-20240527-043438.png?alt=media&amp;token=414dd2a1-4c5c-4355-afcf-e959da3663d5" alt="" width="375"><figcaption></figcaption></figure>

**Step 4:** Introduce new version screen. Click "Update" to log in to your chosen social account.

<figure><img src="https://904341613-files.gitbook.io/~/files/v0/b/gitbook-x-prod.appspot.com/o/spaces%2F-MH4bZ3PuLVs6zPxsi0v%2Fuploads%2F2wIME6RHHR41X85Aqbf9%2Fimage-20240529-063210.png?alt=media&amp;token=68459ce3-a981-4fab-830e-3e5252b3cdf7" alt=""><figcaption></figcaption></figure>

<figure><img src="https://904341613-files.gitbook.io/~/files/v0/b/gitbook-x-prod.appspot.com/o/spaces%2F-MH4bZ3PuLVs6zPxsi0v%2Fuploads%2FlPqkkOt7cKw9DxOF4bgt%2Fimage-20240529-063250.png?alt=media&amp;token=5d424d9d-935d-4386-ae97-896e4e4a82c9" alt=""><figcaption></figcaption></figure>

***Notes:***

* *After the update, you will have 2 wallets under the same AppleID/Facebook account. Their addresses are different, since one is in the Old version (has “Old version“ label), and the other is in New.*

  * *Click "How to add New version wallet" for Saros user guide.*

  <figure><img src="https://904341613-files.gitbook.io/~/files/v0/b/gitbook-x-prod.appspot.com/o/spaces%2F-MH4bZ3PuLVs6zPxsi0v%2Fuploads%2FF4BG2JrBCmz5ogrkHX29%2Fimage-20240528-123524.png?alt=media&amp;token=93d7863f-8178-47ab-8414-49a6118e7b39" alt="" width="375"><figcaption></figcaption></figure>

#### 2. Email <a href="#id-2.-email" id="id-2.-email"></a>

**a.** **Method 1: Login again**

**Step 1:** Access the Saros Super App.

* For existing users, proceed to Step 2
* For new users, proceed to Step 3.

**Step 2:** Click on Wallet section in the top left corner, then **click** ![:heavy\_plus\_sign:](https://pf-emoji-service--cdn.us-east-1.prod.public.atl-paas.net/standard/caa27a19-fc09-4452-b2b4-a301552fd69c/32x32/2795.png) **Icon** on the top right corner

<div align="center"><figure><img src="https://904341613-files.gitbook.io/~/files/v0/b/gitbook-x-prod.appspot.com/o/spaces%2F-MH4bZ3PuLVs6zPxsi0v%2Fuploads%2FyP7XHWk7nix7KX9DSrtU%2Fimage-20240315-091339.png?alt=media&amp;token=bbd409ff-ff7a-444b-ae36-f64d051ea285" alt="" width="375"><figcaption></figcaption></figure> <figure><img src="https://904341613-files.gitbook.io/~/files/v0/b/gitbook-x-prod.appspot.com/o/spaces%2F-MH4bZ3PuLVs6zPxsi0v%2Fuploads%2FciYXebdd9tRq6J69JbR9%2Fimage-20240315-084926%20(1).png?alt=media&amp;token=adc24746-deef-468f-a6ed-0a31fd8f80e7" alt="" width="375"><figcaption></figcaption></figure></div>

**Step 3:**

* Select “Social Wallet” → it will navigate to the web view.
* Choose social wallet method “Email“

<div><figure><img src="https://904341613-files.gitbook.io/~/files/v0/b/gitbook-x-prod.appspot.com/o/spaces%2F-MH4bZ3PuLVs6zPxsi0v%2Fuploads%2ForsvxU36Ix1XJbppWD9K%2Fimage.png?alt=media&amp;token=6fc8320c-861a-4750-9a9c-20f7ea064291" alt="" width="388"><figcaption></figcaption></figure> <figure><img src="https://904341613-files.gitbook.io/~/files/v0/b/gitbook-x-prod.appspot.com/o/spaces%2F-MH4bZ3PuLVs6zPxsi0v%2Fuploads%2FwjahwqxNVmcmidxKmQ8i%2Fimage%20(2).png?alt=media&amp;token=6557e832-85df-4a7e-a978-6dbfd60f5a8f" alt="" width="375"><figcaption></figcaption></figure></div>

**Step 4:** Enter your Email, click "**Continue**" and Saros will send a verification email to your inbox.

<div><figure><img src="https://904341613-files.gitbook.io/~/files/v0/b/gitbook-x-prod.appspot.com/o/spaces%2F-MH4bZ3PuLVs6zPxsi0v%2Fuploads%2FMp3GRisONEGqAjU7yvxI%2Fimage%20(1).png?alt=media&amp;token=182523fe-6c9a-4a77-8c27-31e8876f9a08" alt="" width="375"><figcaption></figcaption></figure> <figure><img src="https://904341613-files.gitbook.io/~/files/v0/b/gitbook-x-prod.appspot.com/o/spaces%2F-MH4bZ3PuLVs6zPxsi0v%2Fuploads%2FJxZrxiAuNi5hkt3xw5bE%2Fimage.png?alt=media&amp;token=36b396a7-a852-47eb-b37c-80d37148cc4d" alt="" width="375"><figcaption></figcaption></figure> <figure><img src="https://904341613-files.gitbook.io/~/files/v0/b/gitbook-x-prod.appspot.com/o/spaces%2F-MH4bZ3PuLVs6zPxsi0v%2Fuploads%2FWql7gb8bYarQEW2jcMuk%2Fimage%20(3).png?alt=media&amp;token=45937504-2eec-4def-bd54-2a6e90a1e294" alt="" width="375"><figcaption></figcaption></figure></div>

**Step 5:** After clicking on the verification email in your inbox:

* If your email already has a wallet in the Old version and no wallet in the New version → proceed to Step 6.
* If your email doesn't have a wallet in the Old/New version or already has a wallet in the New version → wait for a few minutes, and then log into that wallet.

<figure><img src="https://904341613-files.gitbook.io/~/files/v0/b/gitbook-x-prod.appspot.com/o/spaces%2F-MH4bZ3PuLVs6zPxsi0v%2Fuploads%2FWM96TR036VedgcsNDNMY%2Fimage.png?alt=media&amp;token=436e4106-551a-4532-8d95-3d073cfb3a41" alt="" width="375"><figcaption></figcaption></figure>

**Step 6:** Show introduction screen. Click "**Update**" to initiate the migration process, and Saros will send the second verification email to your inbox.

<div><figure><img src="https://904341613-files.gitbook.io/~/files/v0/b/gitbook-x-prod.appspot.com/o/spaces%2F-MH4bZ3PuLVs6zPxsi0v%2Fuploads%2FRGPjCTpxJlrCRt9Lw2nt%2Fimage.png?alt=media&amp;token=f1663338-0423-4614-bbf0-9bc5e750c2e8" alt="" width="375"><figcaption></figcaption></figure> <figure><img src="https://904341613-files.gitbook.io/~/files/v0/b/gitbook-x-prod.appspot.com/o/spaces%2F-MH4bZ3PuLVs6zPxsi0v%2Fuploads%2FL49FrFX3oyAKA0twWclm%2Fimage%20(4).png?alt=media&amp;token=2eda615a-7334-4972-858b-ee0de668c1b5" alt="" width="375"><figcaption></figcaption></figure> <figure><img src="https://904341613-files.gitbook.io/~/files/v0/b/gitbook-x-prod.appspot.com/o/spaces%2F-MH4bZ3PuLVs6zPxsi0v%2Fuploads%2FOT8NSulGh6a4hghaY38t%2Fimage%20(5).png?alt=media&amp;token=ae6e2ad7-b479-4925-a963-f8d1dd9ece6b" alt="" width="375"><figcaption></figcaption></figure></div>

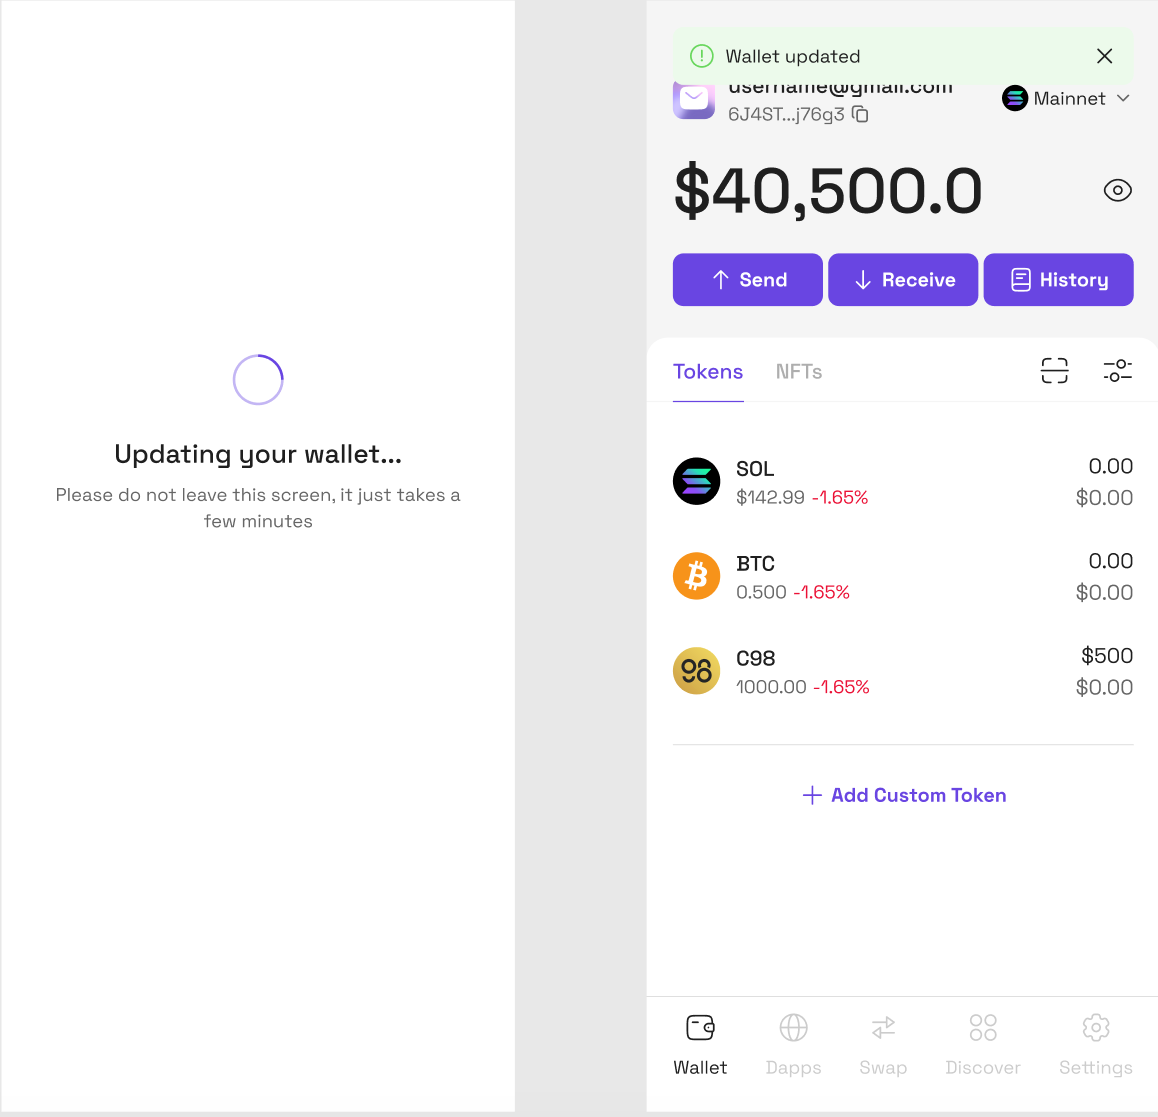
**Step 7:** After clicking on the second verification email in your inbox, the process begins to load and update your wallet.

<figure><img src="https://904341613-files.gitbook.io/~/files/v0/b/gitbook-x-prod.appspot.com/o/spaces%2F-MH4bZ3PuLVs6zPxsi0v%2Fuploads%2FuM0K6UV9uAFAdF4ddUft%2Fimage.png?alt=media&amp;token=c7e23009-dd10-493c-8e69-eb1b60051905" alt=""><figcaption></figcaption></figure>

**b.** **Method 2: Update from Old version wallet**

***Pre-condition:** User has Old version wallets*

* **Step 1:** On token screen, access the "Old Version" wallet, and click the "**Update**" button to start a process similar to step 6.

<figure><img src="https://904341613-files.gitbook.io/~/files/v0/b/gitbook-x-prod.appspot.com/o/spaces%2F-MH4bZ3PuLVs6zPxsi0v%2Fuploads%2FVZxL0QQXNgaqiJAtgr0q%2Fimage.png?alt=media&amp;token=271d3277-27b8-4e2b-85ee-74fb912b184f" alt="" width="375"><figcaption></figcaption></figure>

***Notes:** The Email or Google address and assets from the Old Version remain unchanged in the New version.*

#### 3. Google <a href="#id-3.-google" id="id-3.-google"></a>

**a.** **Method 1: Login again**

**Step 1:** Access the Saros Super App.

* For existing users, proceed to Step 2
* For new users, proceed to Step 3.

**Step 2:** Click on Wallet section in the top left corner, then **click** ![:heavy\_plus\_sign:](https://pf-emoji-service--cdn.us-east-1.prod.public.atl-paas.net/standard/caa27a19-fc09-4452-b2b4-a301552fd69c/32x32/2795.png) **Icon** on the top right corner

<div><figure><img src="https://904341613-files.gitbook.io/~/files/v0/b/gitbook-x-prod.appspot.com/o/spaces%2F-MH4bZ3PuLVs6zPxsi0v%2Fuploads%2FLsEp2vb3yrnx5xOR9w0y%2Fimage%20(7).png?alt=media&amp;token=af84965c-fb7c-41c2-acb2-9e11601a0194" alt="" width="375"><figcaption></figcaption></figure> <figure><img src="https://904341613-files.gitbook.io/~/files/v0/b/gitbook-x-prod.appspot.com/o/spaces%2F-MH4bZ3PuLVs6zPxsi0v%2Fuploads%2F26wLLJQDqpxBcDVPxHYo%2Fimage%20(6).png?alt=media&amp;token=dc4b19b6-338d-40e3-a5a5-c0d71d9f414a" alt="" width="375"><figcaption></figcaption></figure></div>

**Step 3:**

* Select “Social Wallet” → it will navigate to the web view.
* Choose social wallet method “Google“

<div><figure><img src="https://904341613-files.gitbook.io/~/files/v0/b/gitbook-x-prod.appspot.com/o/spaces%2F-MH4bZ3PuLVs6zPxsi0v%2Fuploads%2F81EY7w2toomJr4ZG77QS%2Fimage.png?alt=media&amp;token=0414090f-bc22-487a-9601-18c2a9bdf76d" alt="" width="388"><figcaption></figcaption></figure> <figure><img src="https://904341613-files.gitbook.io/~/files/v0/b/gitbook-x-prod.appspot.com/o/spaces%2F-MH4bZ3PuLVs6zPxsi0v%2Fuploads%2FrBsjDRTxsAm36Dgu0R3o%2Fimage%20(8).png?alt=media&amp;token=503d513c-5522-4a91-b2fb-ca7067adbc7d" alt="" width="375"><figcaption></figcaption></figure></div>

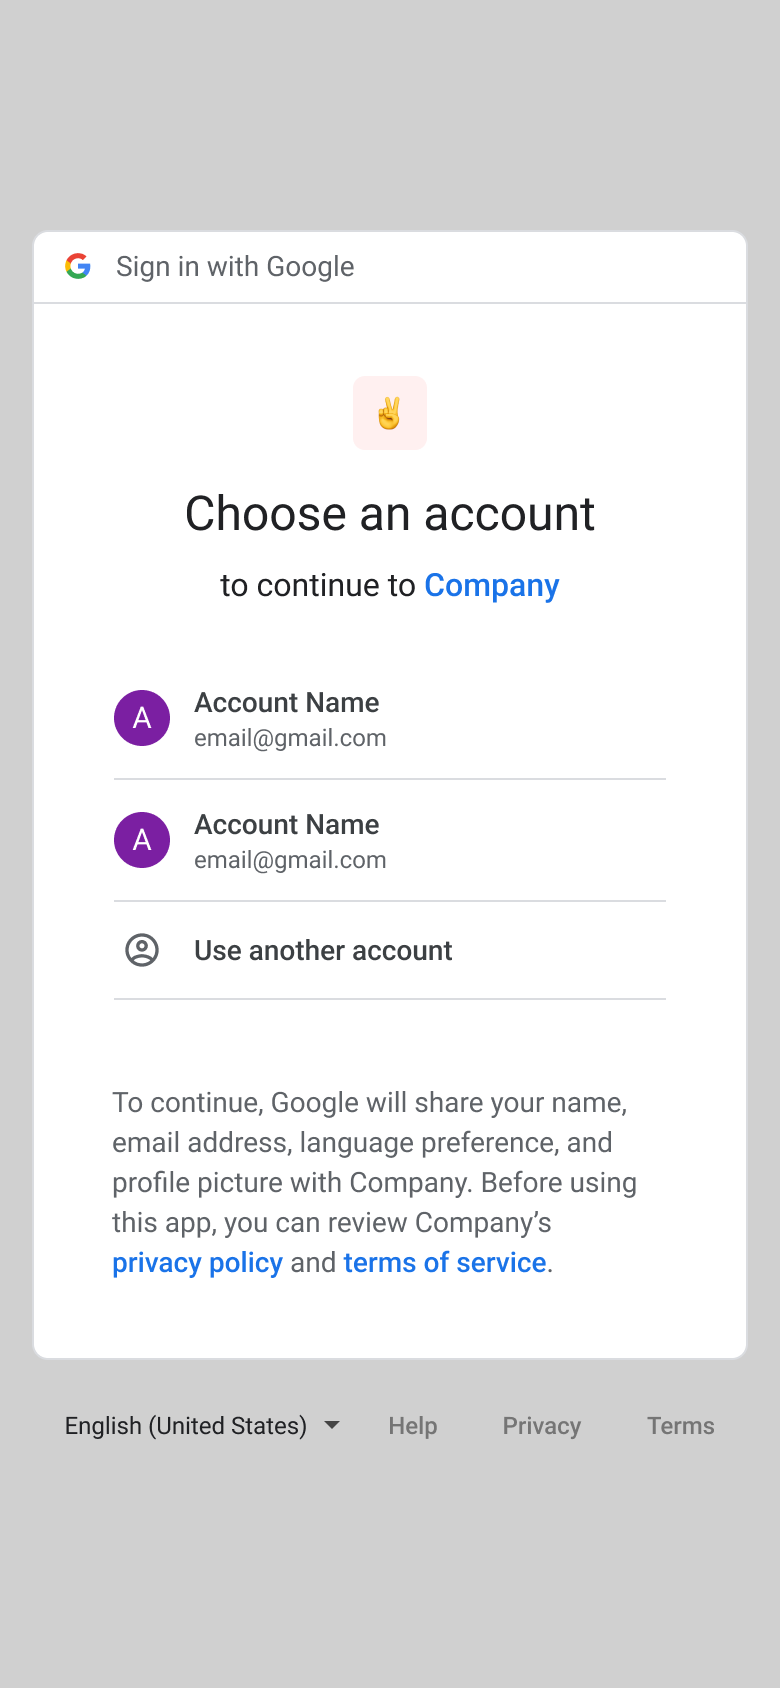
**Step 4:** Choose Google account

<figure><img src="https://904341613-files.gitbook.io/~/files/v0/b/gitbook-x-prod.appspot.com/o/spaces%2F-MH4bZ3PuLVs6zPxsi0v%2Fuploads%2FS77Z74UQS0s8FjtZ1sWI%2Fimage.png?alt=media&amp;token=5ef4a1ee-1d52-4133-a078-92c1c20550f0" alt="" width="375"><figcaption></figcaption></figure>

**Step 5:** After selecting the Google account:

* If the Google account has a wallet in the Old version but not in the New version → proceed to Step 6.
* If the Google account does not have a wallet in the Old version or already has a wallet in the New version → log into that wallet.

**Step 6:**

* Show introduction screen for user identification.
* Click "Choose account to update" to begin the migration process and display a list of Google accounts for the user to select.
  * User must choose the same account as the first selection made in Step 4.

<div><figure><img src="https://904341613-files.gitbook.io/~/files/v0/b/gitbook-x-prod.appspot.com/o/spaces%2F-MH4bZ3PuLVs6zPxsi0v%2Fuploads%2FqwTGw4e2cBOWHixqx2xq%2Fimage.png?alt=media&amp;token=1f974ffb-aeb8-4d08-a68e-34031409495f" alt="" width="375"><figcaption></figcaption></figure> <figure><img src="https://904341613-files.gitbook.io/~/files/v0/b/gitbook-x-prod.appspot.com/o/spaces%2F-MH4bZ3PuLVs6zPxsi0v%2Fuploads%2FWKEtEeyDnaGqQ1Ilce5e%2Fimage%20(9).png?alt=media&amp;token=ff8f7063-c10f-4981-b408-0141d11f7680" alt="" width="375"><figcaption></figcaption></figure></div>

**Step 7:** Start loading and update that wallet

<figure><img src="https://904341613-files.gitbook.io/~/files/v0/b/gitbook-x-prod.appspot.com/o/spaces%2F-MH4bZ3PuLVs6zPxsi0v%2Fuploads%2FlygDaGXsOYM8vCsa4YhP%2Fimage.png?alt=media&amp;token=6ab93c7c-cf21-4833-81e6-10ddf2bfd0b1" alt=""><figcaption></figcaption></figure>

**b.** **Method 2: Update from Old version wallet**

***Pre-condition:** User has Old version wallets*

* **Step 1:** On token screen, access the "Old Version" wallet, and click the "**Update**" button to start a process similar to step 6.
  * User must choose the same account as login wallet

<figure><img src="https://904341613-files.gitbook.io/~/files/v0/b/gitbook-x-prod.appspot.com/o/spaces%2F-MH4bZ3PuLVs6zPxsi0v%2Fuploads%2FrX7h9szMEdmtPq7YnySM%2Fimage.png?alt=media&amp;token=f9d3042d-d6eb-4e51-96c2-06a9400e856c" alt="" width="375"><figcaption></figcaption></figure>

***Notes:** The Email or Google address and assets from the Old Version remain unchanged in the New version.*